目前為止都是建立buffer、texture物件同時上傳資料,之後就不修改資料。這次要做動態了,也就是程式執行途中上傳資料到顯示記憶體。
前篇 Direct3D 11 使用貼圖
OpenGL篇 OpenGL 上傳資料至buffer物件
程式教學目錄
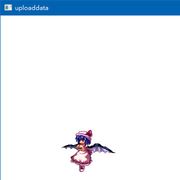
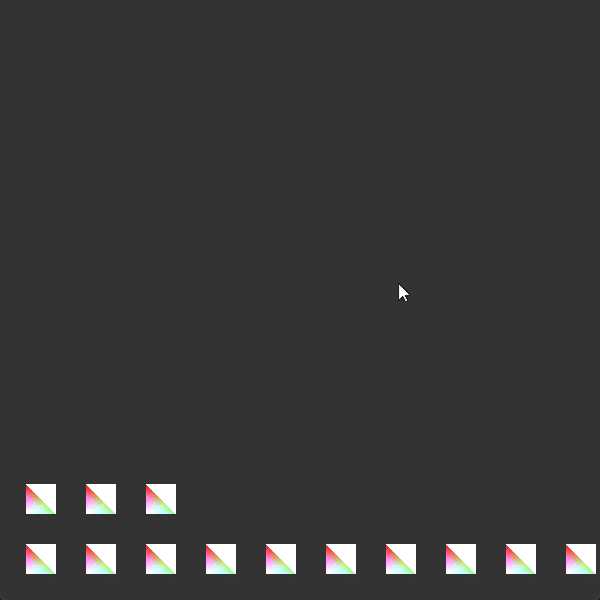
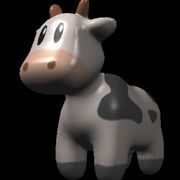
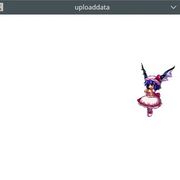
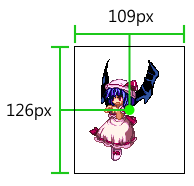
這次要用的圖。

下載後把檔名改成remilia.png,放在與exe相同資料夾。
來源:ヘポモチ! http://forest.her.jp/moricchi/dot.htm
原圖是GIF動畫,我把各個畫格拆開。
註:讀圖檔的函式庫:WIC是可以讀取GIF各個畫格的,利用decoder->GetFrame()第1參數,本篇沒有使用。
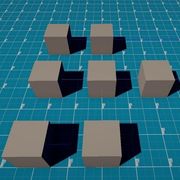
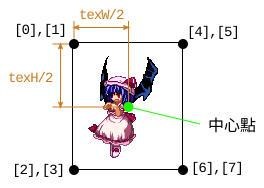
畫格是這樣,以中央為定位點。長度不是寫在程式裡,而是從圖檔寬高計算。
這次做了三種動態
uploaddata.hlsl
邏輯跟前篇差不多,顏色改放在constant buffer而不是頂點資料。vertex shader把以像素為單位的位置和貼圖坐標換算成-1~1,pixel shader讀取貼圖、把顏色與globalColor相乘。
windowSizeRcp的Rcp=reciprocal=倒數。電腦算除法比乘法慢得多,寫程式一個優化技巧是儘量用乘法代替除法,雖然本篇只有4個頂點影響很小,示範一下這個方法。本來坐標要除以視窗寬高,這裡由CPU事先把寛高的倒數算出,shader裡用乘法,這樣只要做一次除法;而且主程式裡的「1.0/WINDOW_W、1.0/WINDOW_H」是常數,編譯時就會算出來,執行時連除法也不會有。反之如果在vertex shader裡算除法,n個頂點就要做n次除法。
用這兩個指令編譯
再來是主程式
uploaddata.cpp
程式開始宣告一些變數記錄狀態,並設定一些動畫相關數值。這裡速率、畫格數等數值都寫在程式裡,因為本篇想儘量簡化主題以外的部分,正式做軟體時可以看情況放在外部檔案。
程式結構方面,將邏輯和繪圖分開:用作業系統API讀取輸入,將按鍵狀態存在變數keyState;在nextFrame()把所有物體的坐標和顏色算好;然後drawScreen()才畫圖。D3D的函式全放在drawScreen()裡面,而不是每算好一個物體就呼叫繪圖指令。
WndProc()增加了讀取輸入的部分,用到的函式和常數見這篇:讀取鍵盤與滑鼠輸入 (Windows)
LOOKUP_TABLE是把要用的五個按鍵的virtual-key code寫成一個陣列,收到按鍵事件時檢查virtual-key code有沒有在這個陣列裡,然後把按鍵是否按下存在keyState。這裡用union,array[5]和up等五個欄位佔用相同空間,可以用陣列也可以用struct的語法存取資料。
以下前4個函式跟以前一樣,loadTexture()只有小幅改變,就不解釋了。
loadWholeFile()的作業系統API說明在此:檔案操作—Windows篇
WIC的用法見這篇:讀取圖檔的方法-Windows篇
initSettings()裡,以下七種物件跟以前大致相同,也不再解釋。主要不同是input layout,以及VSSetXXX()、PSSetXXX()根據shader調整。
ID3D11VertexShader
ID3D11PixelShader
ID3D11InputLayout
ID3D11RasterizerState
ID3D11DepthStencilState
ID3D11BlendState
ID3D11SamplerState
這些是設定值,一般是一開始就把整個程式要用的都建好,之後看情況切換。
貼圖和buffer是資料,比較需要在執行途中建立或刪除。這兩樣其實不要用全域變數寫死,用物件管理比較好,但本篇不希望篇幅過長,所以用全域變數且在程式開始時一併建立物件,動態管理等以後有需要再用。
buffer物件此時只設定預留的byte數,之後再上傳資料,與前篇有以下不同:
- Usage=DYNAMIC。
- device->CreateBuffer()第二參數是初始資料,填NULL。
- 多了CPUAccessFlags。
MSDN: ID3D11Device::CreateBuffer()
MSDN: D3D11_BUFFER_DESC
MSDN: D3D11_USAGE enumeration
Usage欄位是告訴系統CPU和GPU會不會修改這個物件,之前已經用過IMMUTABLE,有四個值可以填。
GPU寫入這一欄,copy是指context->CopyResource()和context->CopySubresourceRegion(),不跑pipeline也不執行shader,直接複製記憶體的一塊區域。
如果你把某個物件設成IMMUTABLE,之後用context->Map()寫入資料會直接跳error,這應該是作業系統API的階段擋掉,還沒呼叫到驅動程式。
一般3D模型的頂點資料是上傳之後就不修改,位置、動作資料是用constant buffer上傳,頂點資料是用IMMUTABLE。
貼圖物件也有Usage和CPUAccessFlags欄位,如果想建立可修改的貼圖物件,也是照這樣填。
最後是邏輯物件初值,本篇寫在初始化函式裡,但正式做遊戲時這種物件都是途中動態產生和刪除。
nextFrame()是邏輯,跟OpenGL篇完全一樣,把系統和邏輯分離的好處之一是在不同平台邏輯部分的code可以共用。
前面用struct keyState把按鈕狀態記錄下來,這裡用keyState來判斷。
換畫格的做法是用一個計數器,每個frame增加1,加到一定數量就歸零並修改貼圖坐標。
drawScreen()是呼叫Direct3D的函式畫圖。
myCharacter裡記錄的是圖的xy坐標、貼圖的xywh,要先算出矩形4個頂點的坐標才能傳給D3D畫圖。
把中心點坐標與畫格寬高的一半相加或相減,算出四個頂點的位置。
「texW/2.0」程式寫成除法,但編譯器也知道除法比乘法慢得多,會儘量用乘法代替除法,像這樣除以浮點常數的時候,編譯時會轉換成*0.5。
上面說到Usage是DYNAMIC的話上傳資料的方法是context->Map()。D3D會配置好一塊記憶體空間並把指標傳回,你在這塊空間裡填資料,填好後呼叫context->Unmap()將資料上傳到顯示記憶體。
MSDN: D3D11DeviceContext::Map()
MSDN: ID3D11DeviceContext::Unmap()
MSDN: D3D11_MAPPED_SUBRESOURCE structure
Map()的參數:
1:儲存資料的D3D物件,可以是buffer或texture。官方文件是寫ID3D11Resource*,buffer和texture物件有繼承這個class。
2:sub resource,用在一個貼圖物件包含多張點陣圖的情況如mipmap,本篇沒用到。
3:CPU要讀還是要寫。這裡的D3D11_MAP_WRITE_DISCARD是先前的資料全部丟棄,重新填寫一次。
筆者試過,如果Usage是DYNAMIC則這個參數只能填D3D11_MAP_WRITE_DISCARD或D3D11_MAP_WRITE_NO_OVERWRITE,填其他的值會傳回error,另外三個值:READ、WRITE與READ_WRITE好像只能用在Usage=STAGING的物件。
這樣設計可能是效能考量。GPU與CPU並不是同步執行,CPU上傳資料時有可能GPU正在使用這個buffer,此時系統可以配置另一塊空間放資料,等GPU用完buffer後把前一塊空間釋放,叫GPU改用新的空間,這樣CPU就不用等待GPU。
也因此不能假設先前的資料會保留,必須重新填入整個buffer。
4:flags,本篇沒用到。
5:將傳回值放在struct D3D11_MAPPED_SUBRESOURCE。指標放在mapped.pData,另外兩個成員RowPitch和DepthPitch是貼圖才會用到。
前面宣告兩個struct:VertexData和ConstantBuffer就是要填入的資料,宣告一個指標指向Map()傳回的空間,填入struct各個欄位。
build的指令跟前篇一樣
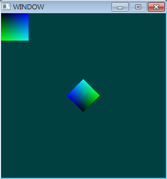
執行的樣子
(此圖檔是30fps,是實際程式的一半)

此圖檔其實是webp格式,不過在巴哈姆等放圖時如果副檔名寫成.webp就不能顯示圖片,所以要把檔案命名成.png,但實際內容是webp。
如果要把圖左右反轉,把pos[]裡頂點順序改一下,讓貼圖坐標左邊對應到畫面坐標右邊。
只要把算式裡兩個「myCharacter.texW/2.0」變號就能達到X坐標對調的效果。
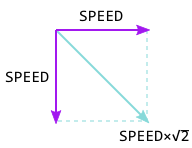
有個地方沒做完整:如果按鍵按斜方向,速度x和y分量都是SPEED,速率會是SPEED×sqrt(2) = 1.414×SPEED,如果想要8方向移動速率都是SPEED就請自己想辦法,這純粹是邏輯判斷而不需要D3D與GL函式。
加上用按鍵操作的功能之後,是不是比較有遊戲的感覺了呢?
如果要用手把操作,之前有介紹讀取手把輸入的方法,自己想辦法做。
用類比桿控制速率或360度方向也可以做到,這純粹是數學計算。
讀取手把輸入 (Windows)
讀取手把輸入 (Linux)
……其實還有個問題存在。這樣操作看看:
- 按住WSAD某一個鍵不放。
- 用滑鼠點一下視窗外面,讓視窗變成非作用中。
- 此時放開按鍵。
此時由於程式沒收到按鍵放開的訊息,keyState裡那個按鍵的flag一直是1,Remilia會一直往同一個方向移動;必須用滑鼠點讓視窗回到作用中,再操作按鍵才能解除。
這要偵測視窗得到或失去focus的訊息才能處理,以後有機會再介紹。
前篇 Direct3D 11 使用貼圖
OpenGL篇 OpenGL 上傳資料至buffer物件
程式教學目錄
這次要用的圖。
下載後把檔名改成remilia.png,放在與exe相同資料夾。
來源:ヘポモチ! http://forest.her.jp/moricchi/dot.htm
原圖是GIF動畫,我把各個畫格拆開。
註:讀圖檔的函式庫:WIC是可以讀取GIF各個畫格的,利用decoder->GetFrame()第1參數,本篇沒有使用。
畫格是這樣,以中央為定位點。長度不是寫在程式裡,而是從圖檔寬高計算。
這次做了三種動態
- 按WSAD鍵讓圖上下左右移動。
- 按空白鍵不放時圖變成黑色,放開後恢復。
- 每隔一段時間換畫格。
uploaddata.hlsl
| //constant buffer,對應到struct ConstantBuffer cbuffer cbuffer0 :register(b0){ float4 globalColor; float2 windowSizeRcp; }; Texture2D texture0 :register(t0); SamplerState sampler0 :register(s0); //頂點資料,對應到struct VertexData struct VsIn{ float2 pos :P; int2 texCoord :T; }; //vertex傳給pixel shader的資料 struct VsOut{ float4 svPos :SV_Position; float2 texCoord :T; }; void vsMain(in VsIn IN, out VsOut OUT) { float2 outPos=IN.pos*float2(2,-2)*windowSizeRcp+float2(-1,1); OUT.svPos=float4(outPos, 0, 1); float2 texSize; texture0.GetDimensions(texSize.x, texSize.y); OUT.texCoord=IN.texCoord/texSize; } float4 psMain(in VsOut IN):SV_Target { float4 texColor=texture0.Sample(sampler0, IN.texCoord); return texColor*globalColor; } |
windowSizeRcp的Rcp=reciprocal=倒數。電腦算除法比乘法慢得多,寫程式一個優化技巧是儘量用乘法代替除法,雖然本篇只有4個頂點影響很小,示範一下這個方法。本來坐標要除以視窗寬高,這裡由CPU事先把寛高的倒數算出,shader裡用乘法,這樣只要做一次除法;而且主程式裡的「1.0/WINDOW_W、1.0/WINDOW_H」是常數,編譯時就會算出來,執行時連除法也不會有。反之如果在vertex shader裡算除法,n個頂點就要做n次除法。
用這兩個指令編譯
| fxc uploaddata.hlsl /T vs_4_0 /E vsMain /Fo uploaddata_vs fxc uploaddata.hlsl /T ps_4_0 /E psMain /Fo uploaddata_ps |
再來是主程式
uploaddata.cpp
| #define UNICODE #include<windows.h> #include<d3d11.h> #include<stdio.h> #include<stdint.h> #include<stddef.h> //使用offsetof macro #include<wincodec.h> //讀取圖檔 const int WINDOW_W=400, WINDOW_H=400; IWICImagingFactory* wicFactory; //用來讀取圖檔 //D3D11 global狀態 ID3D11Device* device; ID3D11DeviceContext* context; IDXGISwapChain* swapChain; ID3D11RenderTargetView* screenRenderTarget; //設定值 ID3D11VertexShader* vertexShader; ID3D11PixelShader* pixelShader; ID3D11InputLayout* inputLayout; ID3D11RasterizerState* rsState; ID3D11DepthStencilState* dsState; ID3D11BlendState* blendState; ID3D11SamplerState* sampler; //貼圖 ID3D11ShaderResourceView* shaderResource; uint16_t imageW,imageH; //每個frame會修改的資料 ID3D11Buffer* constantBuffer; ID3D11Buffer* vertexData; //--系統物件 //這兩個struct是要上傳到GPU的資料 struct ConstantBuffer{ float globalColor[4]; float windowSizeRcp[2]; }; //使用「頂點資料layout設定」裡VertexData2的方式,但顏色改放在constant buffer struct VertexData{ float pos[8]; short texCoord[8]; }; //按鈕狀態 union { uint8_t array[5]; struct{ uint8_t up; uint8_t down; uint8_t left; uint8_t right; uint8_t space; }; } keyState; //將keyState.array對應到按鍵的對應表 const uint8_t LOOKUP_TABLE[]={'W','S','A','D',' '}; const int LOOKUP_TABLE_LEN = sizeof(LOOKUP_TABLE); //--邏輯物件 struct { float x,y; //在畫面上的位置,單位為像素 short texX,texY,texW,texH; //貼圖坐標 int frameCounter; //換畫格的計時器 } myCharacter; const float SPEED=4; //單位為pixel/frame const int FRAME_TIME=6; //每秒10格 const int CELL_NUMBER=8; const float BORDER=40; //用來將圖變色 float globalColor[]={1,1,1,1}; //------ //這些函式在後面說明 static int initD3D(HWND window); static void deinitD3D(); static void deinitSettings(); static char* loadWholeFile(const WCHAR* fileName, uint32_t* outFileSize); static ID3D11ShaderResourceView* loadTexture(const WCHAR* fileName, uint16_t* outW, uint16_t* outH); static int initSettings(); static void nextFrame(); static void drawScreen(); //------ //以下是main()與WndProc() static uint32_t getVK(uint32_t lparam){ lparam = (lparam>>16)&0x1ff; if(lparam & 0x100){ lparam^=0xe100; } return MapVirtualKey(lparam, MAPVK_VSC_TO_VK_EX); } LRESULT CALLBACK WndProc(HWND hwnd, UINT message, WPARAM wparam, LPARAM lparam){ switch(message){ case WM_KEYDOWN: case WM_KEYUP:{ uint8_t flag= message==WM_KEYDOWN; uint32_t vk=getVK(lparam); for(int i=0;i<LOOKUP_TABLE_LEN;i++){ if(vk==LOOKUP_TABLE[i]){ keyState.array[i]=flag; break; } } }break; case WM_DESTROY: PostQuitMessage(0); break; default: return DefWindowProc(hwnd,message,wparam,lparam); } return 0; } int WINAPI WinMain(HINSTANCE hInstance, HINSTANCE hPrevInstance, LPSTR lpCmdLine, int nCmdShow){ WNDCLASS wndclass; ZeroMemory(&wndclass, sizeof(WNDCLASS)); wndclass.lpfnWndProc = WndProc; wndclass.hCursor = LoadCursor(NULL, IDC_ARROW); wndclass.lpszClassName = L"window"; RegisterClass(&wndclass); RECT rect={0,0,WINDOW_W,WINDOW_H}; AdjustWindowRect(&rect, WS_CAPTION|WS_SYSMENU|WS_VISIBLE, 0); HWND window=CreateWindow(L"window", L"uploaddata", WS_OVERLAPPED|WS_SYSMENU|WS_VISIBLE, CW_USEDEFAULT, CW_USEDEFAULT, rect.right-rect.left, rect.bottom-rect.top, NULL,NULL,NULL,NULL); //初始化WIC CoInitializeEx(NULL, COINIT_MULTITHREADED); CoCreateInstance(CLSID_WICImagingFactory, NULL, CLSCTX_INPROC_SERVER, IID_IWICImagingFactory, (void**)&wicFactory); if(initD3D(window)){ printf("Can not initialize Direct3D\n"); return 0; } if(initSettings()){ return 0; } timeBeginPeriod(1); MSG msg; int isEnd=0; ULONGLONG prevTime, nextTime; while(!isEnd){ QueryUnbiasedInterruptTime(&prevTime); while(PeekMessage(&msg,NULL,0,0,PM_REMOVE)){ if(msg.message==WM_QUIT){ isEnd=1; } DispatchMessage(&msg); } nextFrame(); //處理邏輯 drawScreen(); //更新畫面 QueryUnbiasedInterruptTime(&nextTime); //單位為100ns (10^-7 sec) ULONGLONG elapsedTime=(nextTime-prevTime)/10000; //除以10000換算成毫秒 (10^-3 sec) int32_t sleepTime=16-elapsedTime; if(sleepTime>0){ Sleep(sleepTime); } } timeEndPeriod(1); deinitSettings(); deinitD3D(); wicFactory->Release(); //結束WIC CoUninitialize(); return 0; } |
程式結構方面,將邏輯和繪圖分開:用作業系統API讀取輸入,將按鍵狀態存在變數keyState;在nextFrame()把所有物體的坐標和顏色算好;然後drawScreen()才畫圖。D3D的函式全放在drawScreen()裡面,而不是每算好一個物體就呼叫繪圖指令。
WndProc()增加了讀取輸入的部分,用到的函式和常數見這篇:讀取鍵盤與滑鼠輸入 (Windows)
LOOKUP_TABLE是把要用的五個按鍵的virtual-key code寫成一個陣列,收到按鍵事件時檢查virtual-key code有沒有在這個陣列裡,然後把按鍵是否按下存在keyState。這裡用union,array[5]和up等五個欄位佔用相同空間,可以用陣列也可以用struct的語法存取資料。
以下前4個函式跟以前一樣,loadTexture()只有小幅改變,就不解釋了。
loadWholeFile()的作業系統API說明在此:檔案操作—Windows篇
WIC的用法見這篇:讀取圖檔的方法-Windows篇
| static int initD3D(HWND window){ HRESULT hr; DXGI_SWAP_CHAIN_DESC scd; ZeroMemory(&scd, sizeof(DXGI_SWAP_CHAIN_DESC)); scd.BufferDesc.Format = DXGI_FORMAT_B8G8R8A8_UNORM; scd.SampleDesc.Count = 1; scd.BufferUsage = DXGI_USAGE_RENDER_TARGET_OUTPUT; scd.BufferCount = 1; scd.OutputWindow = window; scd.Windowed = TRUE; //建立D3D系統物件,feature level=10.0 D3D_FEATURE_LEVEL featureLevel=D3D_FEATURE_LEVEL_10_0; hr=D3D11CreateDeviceAndSwapChain(NULL, D3D_DRIVER_TYPE_HARDWARE, NULL, D3D11_CREATE_DEVICE_SINGLETHREADED, &featureLevel, 1, D3D11_SDK_VERSION,&scd, &swapChain,&device,NULL,&context); if(hr!=S_OK){ return 1; } //取得畫面的framebuffer物件 ID3D11Texture2D* screenTexture; swapChain->GetBuffer(0, __uuidof(ID3D11Texture2D), (void**)&screenTexture); device->CreateRenderTargetView(screenTexture, NULL, &screenRenderTarget); screenTexture->Release(); return 0; } static void deinitD3D(){ device->Release(); context->Release(); swapChain->Release(); screenRenderTarget->Release(); } static void deinitSettings(){ vertexShader->Release(); pixelShader->Release(); inputLayout->Release(); rsState->Release(); dsState->Release(); blendState->Release(); sampler->Release(); shaderResource->Release(); vertexData->Release(); constantBuffer->Release(); } //傳回來的指標要用free()釋放 static char* loadWholeFile(const WCHAR* fileName, uint32_t* outFileSize){ HANDLE file = CreateFile(fileName, GENERIC_READ, FILE_SHARE_READ, NULL, OPEN_EXISTING, FILE_ATTRIBUTE_NORMAL, NULL); if(file==INVALID_HANDLE_VALUE){ *outFileSize=0; return NULL; } DWORD fileSize = GetFileSize(file, NULL); char* data = (char*)malloc(fileSize); DWORD bytes; ReadFile(file, data, fileSize, &bytes, NULL); CloseHandle(file); *outFileSize = fileSize; return data; } //loadTexture()小幅改變,除了ID3D11ShaderResourceView*以外也傳回寬高 static ID3D11ShaderResourceView* loadTexture(const WCHAR* fileName, uint16_t* outW, uint16_t* outH){ //讀取圖檔,把BGRA值存在一個叫pixels的變數 IWICBitmapDecoder* decoder; HRESULT hr = wicFactory->CreateDecoderFromFilename(fileName, NULL, GENERIC_READ,WICDecodeMetadataCacheOnDemand ,&decoder); if(hr!=S_OK){ return NULL; } IWICBitmapFrameDecode* frame; decoder->GetFrame(0,&frame); UINT w,h; frame->GetSize(&w,&h); *outW=w; *outH=h; UINT32* pixels = (UINT32*)malloc(w*h*4); IWICFormatConverter* converter; wicFactory->CreateFormatConverter(&converter); converter->Initialize(frame, GUID_WICPixelFormat32bppBGRA, WICBitmapDitherTypeNone, NULL,0, WICBitmapPaletteTypeCustom); converter->CopyPixels(NULL, w*4, w*h*4, (BYTE*)pixels); converter->Release(); frame->Release(); decoder->Release(); //建立texture物件 D3D11_TEXTURE2D_DESC txDesc; ZeroMemory(&txDesc, sizeof(D3D11_TEXTURE2D_DESC)); txDesc.Width = w; txDesc.Height = h; txDesc.Format = DXGI_FORMAT_B8G8R8A8_UNORM; txDesc.Usage = D3D11_USAGE_IMMUTABLE; txDesc.BindFlags = D3D11_BIND_SHADER_RESOURCE; txDesc.MipLevels = 1; txDesc.ArraySize = 1; txDesc.SampleDesc.Count = 1; D3D11_SUBRESOURCE_DATA srData; srData.pSysMem = pixels; srData.SysMemPitch = w*4; ID3D11Texture2D* texture; hr=device->CreateTexture2D(&txDesc, &srData, &texture); //建立shader resource view物件 ID3D11ShaderResourceView* shaderResourceView; hr=device->CreateShaderResourceView(texture,NULL,&shaderResourceView); texture->Release(); free(pixels); return shaderResourceView; } |
initSettings()裡,以下七種物件跟以前大致相同,也不再解釋。主要不同是input layout,以及VSSetXXX()、PSSetXXX()根據shader調整。
ID3D11VertexShader
ID3D11PixelShader
ID3D11InputLayout
ID3D11RasterizerState
ID3D11DepthStencilState
ID3D11BlendState
ID3D11SamplerState
這些是設定值,一般是一開始就把整個程式要用的都建好,之後看情況切換。
| static int initSettings(){ HRESULT hr; //shader object char* bytecode; uint32_t bytecodeSize; bytecode = loadWholeFile(L"uploaddata_ps", &bytecodeSize); hr = device->CreatePixelShader(bytecode, bytecodeSize,NULL,&pixelShader); free(bytecode); bytecode = loadWholeFile(L"uploaddata_vs", &bytecodeSize); hr = device->CreateVertexShader(bytecode, bytecodeSize,NULL,&vertexShader); context->VSSetShader(vertexShader,NULL,0); context->PSSetShader(pixelShader, NULL,0); //input assembler D3D11_INPUT_ELEMENT_DESC layoutDesc[]={ {"P",0, DXGI_FORMAT_R32G32_FLOAT, 0,0, D3D11_INPUT_PER_VERTEX_DATA ,0}, {"T",0, DXGI_FORMAT_R16G16_SINT, 1,0, D3D11_INPUT_PER_VERTEX_DATA ,0}, }; hr=device->CreateInputLayout(layoutDesc, 2, bytecode,bytecodeSize,&inputLayout); free(bytecode); context->IASetInputLayout(inputLayout); context->IASetPrimitiveTopology(D3D11_PRIMITIVE_TOPOLOGY_TRIANGLESTRIP); //rasterizer D3D11_RASTERIZER_DESC rsDesc; ZeroMemory(&rsDesc, sizeof(D3D11_RASTERIZER_DESC)); rsDesc.FillMode = D3D11_FILL_SOLID; rsDesc.CullMode = D3D11_CULL_NONE; hr=device->CreateRasterizerState(&rsDesc, &rsState); context->RSSetState(rsState); D3D11_VIEWPORT viewport; viewport.TopLeftX = 0; viewport.TopLeftY = 0; viewport.Width = WINDOW_W; viewport.Height = WINDOW_H; viewport.MinDepth = 0; viewport.MaxDepth = 1; context->RSSetViewports(1, &viewport); //depth stencil D3D11_DEPTH_STENCIL_DESC dsDesc; ZeroMemory(&dsDesc, sizeof(D3D11_DEPTH_STENCIL_DESC)); hr=device->CreateDepthStencilState(&dsDesc, &dsState); context->OMSetDepthStencilState(dsState,0); //blend D3D11_BLEND_DESC blendDesc; ZeroMemory(&blendDesc, sizeof(D3D11_BLEND_DESC)); D3D11_RENDER_TARGET_BLEND_DESC* blendDesc2 = blendDesc.RenderTarget; blendDesc2->BlendEnable = 1; blendDesc2->RenderTargetWriteMask = D3D11_COLOR_WRITE_ENABLE_ALL; blendDesc2->BlendOp = D3D11_BLEND_OP_ADD; blendDesc2->SrcBlend = D3D11_BLEND_SRC_ALPHA; blendDesc2->DestBlend = D3D11_BLEND_INV_SRC_ALPHA; blendDesc2->BlendOpAlpha = D3D11_BLEND_OP_ADD; blendDesc2->SrcBlendAlpha = D3D11_BLEND_ONE; blendDesc2->DestBlendAlpha = D3D11_BLEND_INV_SRC_ALPHA; hr=device->CreateBlendState(&blendDesc, &blendState); context->OMSetBlendState(blendState, 0, 0xffffffff); //sampler D3D11_SAMPLER_DESC saDesc; ZeroMemory(&saDesc, sizeof(D3D11_SAMPLER_DESC)); saDesc.AddressU = D3D11_TEXTURE_ADDRESS_WRAP; saDesc.AddressV = D3D11_TEXTURE_ADDRESS_WRAP; saDesc.AddressW = D3D11_TEXTURE_ADDRESS_WRAP; saDesc.Filter = D3D11_FILTER_MIN_MAG_LINEAR_MIP_POINT; hr=device->CreateSamplerState(&saDesc, &sampler); context->PSSetSamplers(2,1,&sampler); //render target context->OMSetRenderTargets(1, &screenRenderTarget, 0); |
貼圖和buffer是資料,比較需要在執行途中建立或刪除。這兩樣其實不要用全域變數寫死,用物件管理比較好,但本篇不希望篇幅過長,所以用全域變數且在程式開始時一併建立物件,動態管理等以後有需要再用。
| //texture shaderResource = loadTexture(L"remilia.png", &imageW, &imageH); context->VSSetShaderResources(0,1,&shaderResource); context->PSSetShaderResources(0,1,&shaderResource); //本章重點之一:vertex data D3D11_BUFFER_DESC buDesc; ZeroMemory(&buDesc, sizeof(D3D11_BUFFER_DESC)); buDesc.ByteWidth = sizeof(VertexData); buDesc.Usage = D3D11_USAGE_DYNAMIC; buDesc.BindFlags = D3D11_BIND_VERTEX_BUFFER; buDesc.CPUAccessFlags = D3D11_CPU_ACCESS_WRITE; hr=device->CreateBuffer(&buDesc, NULL, &vertexData); const UINT stride[]={sizeof(float)*2, sizeof(short)*2}; const UINT offset[]={0, offsetof(VertexData, texCoord)}; ID3D11Buffer* buffers[]={vertexData, vertexData}; context->IASetVertexBuffers(0,2,buffers,stride,offset); //本章重點之二:constant buffer //Usage、CPUAccessFlags跟constant buffer一樣,不用修改 buDesc.ByteWidth = (sizeof(ConstantBuffer)+15) & 0xfff0; buDesc.BindFlags = D3D11_BIND_CONSTANT_BUFFER; hr=device->CreateBuffer(&buDesc, NULL, &constantBuffer); context->VSSetConstantBuffers(0,1,&constantBuffer); context->PSSetConstantBuffers(0,1,&constantBuffer); //邏輯物件的初值 memset(&myCharacter, 0, sizeof(myCharacter)); myCharacter.x = WINDOW_W-BORDER; //把位置設在右邊中央 myCharacter.y = WINDOW_H/2; myCharacter.texW = imageW/CELL_NUMBER; //一個畫格的大小 myCharacter.texH = imageH; return 0; } |
- Usage=DYNAMIC。
- device->CreateBuffer()第二參數是初始資料,填NULL。
- 多了CPUAccessFlags。
MSDN: ID3D11Device::CreateBuffer()
MSDN: D3D11_BUFFER_DESC
MSDN: D3D11_USAGE enumeration
Usage欄位是告訴系統CPU和GPU會不會修改這個物件,之前已經用過IMMUTABLE,有四個值可以填。
| CPU存取 | GPU寫入 | 主要用途 | |
| D3D11_USAGE_DEFAULT | context->UpdateSubresource() | render target、copy | CPU不需要存取,GPU要寫入,如framebuffer物件。 |
| D3D11_USAGE_IMMUTABLE | 不可 | 不可 | 建立之後就不需再修改,如貼圖、頂點資料。 必須在建立物件同時上傳資料。 |
| D3D11_USAGE_DYNAMIC | context->Map() 可寫 |
不可 | 由CPU寫入,GPU不需要修改,如constant buffer、的頂點資料。 |
| D3D11_USAGE_STAGING | context->Map() 可讀可寫 |
copy | 要從GPU傳給CPU的資料,如擷取畫面。 |
如果你把某個物件設成IMMUTABLE,之後用context->Map()寫入資料會直接跳error,這應該是作業系統API的階段擋掉,還沒呼叫到驅動程式。
一般3D模型的頂點資料是上傳之後就不修改,位置、動作資料是用constant buffer上傳,頂點資料是用IMMUTABLE。
貼圖物件也有Usage和CPUAccessFlags欄位,如果想建立可修改的貼圖物件,也是照這樣填。
最後是邏輯物件初值,本篇寫在初始化函式裡,但正式做遊戲時這種物件都是途中動態產生和刪除。
nextFrame()是邏輯,跟OpenGL篇完全一樣,把系統和邏輯分離的好處之一是在不同平台邏輯部分的code可以共用。
| static float clamp(float value, float min, float max){ if(value<=min){ return min; } if(value>=max){ return max; } return value; } static void nextFrame(){ //計算圖位置 float v[2]={0,0}; if(keyState.up){ v[1]=-SPEED; }else if(keyState.down){ v[1]=SPEED; } if(keyState.left){ v[0]=-SPEED; }else if(keyState.right){ v[0]=SPEED; } myCharacter.x+=v[0]; myCharacter.y+=v[1]; //防止圖跑到畫面外 myCharacter.x=clamp(myCharacter.x, BORDER, WINDOW_W-BORDER); myCharacter.y=clamp(myCharacter.y, BORDER, WINDOW_H-BORDER); //換畫格 myCharacter.frameCounter++; if(myCharacter.frameCounter == FRAME_TIME){ myCharacter.frameCounter=0; myCharacter.texX+=myCharacter.texW; if(myCharacter.texX >= imageW){ myCharacter.texX=0; } } //修改顏色 if(keyState.space){ memset(globalColor, 0, sizeof(float)*3); }else{ for(int i=0;i<3;i++){ globalColor[i]=1.0; } } } |
換畫格的做法是用一個計數器,每個frame增加1,加到一定數量就歸零並修改貼圖坐標。
drawScreen()是呼叫Direct3D的函式畫圖。
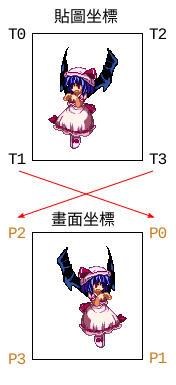
| static void drawScreen(){ const float color[]={1,1,1,1}; context->ClearRenderTargetView(screenRenderTarget, color); //畫出物體,先算出4個頂點的坐標 //4個點分別是左上、左下、右上、右下 float pos[8]; short texCoord[8]; pos[0]= myCharacter.x-myCharacter.texW/2.0; pos[1]= myCharacter.y-myCharacter.texH/2.0; pos[6]= myCharacter.x+myCharacter.texW/2.0; pos[7]= myCharacter.y+myCharacter.texH/2.0; pos[2]= pos[0]; pos[3]= pos[7]; pos[4]= pos[6]; pos[5]= pos[1]; texCoord[0]= myCharacter.texX; texCoord[1]= myCharacter.texY; texCoord[6]= myCharacter.texX+myCharacter.texW; texCoord[7]= myCharacter.texY+myCharacter.texH; texCoord[2]= texCoord[0]; texCoord[3]= texCoord[7]; texCoord[4]= texCoord[6]; texCoord[5]= texCoord[1]; //將頂點坐標上傳到vertexData D3D11_MAPPED_SUBRESOURCE mapped; context->Map(vertexData, 0,D3D11_MAP_WRITE_DISCARD,0,&mapped); VertexData* destPtr1=(VertexData*)mapped.pData; memcpy(destPtr1->pos, pos, sizeof(pos)); memcpy(destPtr1->texCoord, texCoord, sizeof(texCoord)); context->Unmap(vertexData, 0); //將globalColor與視窗大小上傳到constant buffer context->Map(constantBuffer, 0,D3D11_MAP_WRITE_DISCARD,0,&mapped); ConstantBuffer* destPtr2=(ConstantBuffer*)mapped.pData; memcpy(destPtr2->globalColor, globalColor, sizeof(globalColor)); destPtr2->windowSizeRcp[0]= 1.0/WINDOW_W; destPtr2->windowSizeRcp[1]= 1.0/WINDOW_H; context->Unmap(constantBuffer, 0); context->Draw(4, 0); swapChain->Present(0, 0); } |
把中心點坐標與畫格寬高的一半相加或相減,算出四個頂點的位置。
「texW/2.0」程式寫成除法,但編譯器也知道除法比乘法慢得多,會儘量用乘法代替除法,像這樣除以浮點常數的時候,編譯時會轉換成*0.5。
上面說到Usage是DYNAMIC的話上傳資料的方法是context->Map()。D3D會配置好一塊記憶體空間並把指標傳回,你在這塊空間裡填資料,填好後呼叫context->Unmap()將資料上傳到顯示記憶體。
MSDN: D3D11DeviceContext::Map()
MSDN: ID3D11DeviceContext::Unmap()
MSDN: D3D11_MAPPED_SUBRESOURCE structure
Map()的參數:
1:儲存資料的D3D物件,可以是buffer或texture。官方文件是寫ID3D11Resource*,buffer和texture物件有繼承這個class。
2:sub resource,用在一個貼圖物件包含多張點陣圖的情況如mipmap,本篇沒用到。
3:CPU要讀還是要寫。這裡的D3D11_MAP_WRITE_DISCARD是先前的資料全部丟棄,重新填寫一次。
筆者試過,如果Usage是DYNAMIC則這個參數只能填D3D11_MAP_WRITE_DISCARD或D3D11_MAP_WRITE_NO_OVERWRITE,填其他的值會傳回error,另外三個值:READ、WRITE與READ_WRITE好像只能用在Usage=STAGING的物件。
這樣設計可能是效能考量。GPU與CPU並不是同步執行,CPU上傳資料時有可能GPU正在使用這個buffer,此時系統可以配置另一塊空間放資料,等GPU用完buffer後把前一塊空間釋放,叫GPU改用新的空間,這樣CPU就不用等待GPU。
也因此不能假設先前的資料會保留,必須重新填入整個buffer。
4:flags,本篇沒用到。
5:將傳回值放在struct D3D11_MAPPED_SUBRESOURCE。指標放在mapped.pData,另外兩個成員RowPitch和DepthPitch是貼圖才會用到。
前面宣告兩個struct:VertexData和ConstantBuffer就是要填入的資料,宣告一個指標指向Map()傳回的空間,填入struct各個欄位。
build的指令跟前篇一樣
| cl uploaddata.cpp /Feuploaddata.exe /O2 /MD /link user32.lib d3d11.lib winmm.lib windowscodecs.lib ole32.lib |
執行的樣子
(此圖檔是30fps,是實際程式的一半)
此圖檔其實是webp格式,不過在巴哈姆等放圖時如果副檔名寫成.webp就不能顯示圖片,所以要把檔案命名成.png,但實際內容是webp。
如果要把圖左右反轉,把pos[]裡頂點順序改一下,讓貼圖坐標左邊對應到畫面坐標右邊。
只要把算式裡兩個「myCharacter.texW/2.0」變號就能達到X坐標對調的效果。
| pos[0]= myCharacter.x+myCharacter.texW/2.0; pos[1]= myCharacter.y-myCharacter.texH/2.0; pos[6]= myCharacter.x-myCharacter.texW/2.0; pos[7]= myCharacter.y+myCharacter.texH/2.0; pos[2]= pos[0]; pos[3]= pos[7]; pos[4]= pos[6]; pos[5]= pos[1]; |
有個地方沒做完整:如果按鍵按斜方向,速度x和y分量都是SPEED,速率會是SPEED×sqrt(2) = 1.414×SPEED,如果想要8方向移動速率都是SPEED就請自己想辦法,這純粹是邏輯判斷而不需要D3D與GL函式。
加上用按鍵操作的功能之後,是不是比較有遊戲的感覺了呢?
如果要用手把操作,之前有介紹讀取手把輸入的方法,自己想辦法做。
用類比桿控制速率或360度方向也可以做到,這純粹是數學計算。
讀取手把輸入 (Windows)
讀取手把輸入 (Linux)
……其實還有個問題存在。這樣操作看看:
- 按住WSAD某一個鍵不放。
- 用滑鼠點一下視窗外面,讓視窗變成非作用中。
- 此時放開按鍵。
此時由於程式沒收到按鍵放開的訊息,keyState裡那個按鍵的flag一直是1,Remilia會一直往同一個方向移動;必須用滑鼠點讓視窗回到作用中,再操作按鍵才能解除。
這要偵測視窗得到或失去focus的訊息才能處理,以後有機會再介紹。