本來想只寫描繪角色的,擔心內容太少,所以角色跟顯示圖片就一起寫好了。


RM MV學習筆記(6) 描繪進度條
先打開我們熟悉的Scene_Title_new.js,找到我們改了N次了refresh。如果Scene_Title_new.js壞掉或弄丟或無法正常運作的可以回去看筆記(2)。
這次要說明的是這兩個函式:
//描繪角色臉圖this.drawFace(faceName, faceIndex, x, y, width, height)//描繪角色行走圖this.drawCharacter(characterName, characterIndex, x, y)
展示一下怎麼使用,在這裡加上藍字部分:
Window_Wand.prototype.refresh = function() {
var x = this.textPadding();var width = this.contents.width - this.textPadding() * 2;this.contents.clear();this.changeTextColor( this.textColor(32) );this.drawText( "測試文字" , x, 0 );this.drawFace('Actor1',0, x, this.lineHeight(), 144,144) ;//顯示角色臉圖this.resetFontSettings();
};
出來了!
現在來翻譯一下這個函式:
this.drawFace( 'Actor1', 0, x, this.lineHeight(), 144,144)this.drawFace(faceName, faceIndex, x, y, width, height)
faceName:圖檔名稱,圖檔必須放在 img\faces\ 的路徑下
faceIndex:圖檔索引編號,0~7號對應號碼如下:
x,y :圖片顯示位置的x , y座標
width , height :圖片顯示大小的寬高區域
舉例來說,如果我不想顯示一整張臉,想讓他小一點,可以更改height 值,預設的臉圖大小是144,改成35看看。
測試結果:
我們現在加上洋紅色的這一行:
Window_Wand.prototype.refresh = function() {
var x = this.textPadding();var width = this.contents.width - this.textPadding() * 2;this.contents.clear();this.changeTextColor( this.textColor(32) );this.drawText( "測試文字" , x, 0 );//顯示角色臉圖this.drawFace('Actor1',0, x, this.lineHeight(), 144,144) ;//顯示角色行走圖this.drawCharacter('Actor1', 0, x + 144 + 20 , this.lineHeight()*2 ) ;this.resetFontSettings();
};
測試一下結果,行走圖也出來了。
翻譯一下:
this.drawCharacter(characterName, characterIndex, x, y)
this.drawCharacter('Actor1', 0, x + 144 + 20 , this.lineHeight()*2 ) ;
characterName:圖片的檔案名稱,路徑要放在 img\characters\裡面
characterIndex:圖片的索引編號,一樣從左上角往右0~3,下方第二排為4~7。
x,y:圖片顯示的座標
這時候可能有人要問了,為什麼我怎麼測圖片就是不出來!也沒有當機,沒有回傳錯誤,到底問題出在哪裡!?
如果你也是在標題畫面測的話,去按一下選項,然後再回標題畫面,圖就出來了...好神奇喔...
其實只是因為這些圖片沒有「立刻刷新」。
去找個空白地方加上這一段:
Window_Wand.prototype.update = function() {
this.refresh();
};
圖片就會跑出來了。
如果不想顯示固定某人的臉,而是目前隊伍第二個人的臉呢?有另外一個函式可以用:
跟actor有關的函式補充如下:
//顯示第n個角色的行走圖this.drawActorCharacter(actor, x, y)//顯示第n個角色的臉圖this.drawActorFace(actor, x, y, width, height)//顯示第n個角色的名字this.drawActorName(actor, x, y, width)//顯示第n個角色的職業this.drawActorClass(actor, x, y, width)//顯示第n個角色的暱稱this.drawActorNickname(actor, x, y, width)//顯示第n個角色的等級this.drawActorLevel(actor, x, y)//顯示第n個角色的圖示this.drawActorIcons(actor, x, y, width)
actor 可填入:$gameActors._data[角色順序]
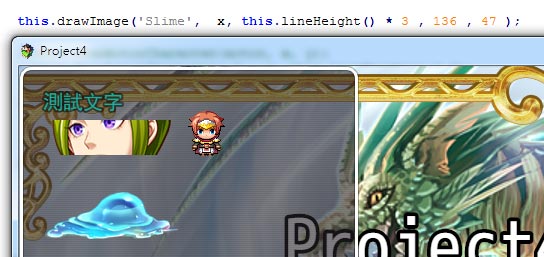
那如果我想要顯示自己的圖呢?好的,我們就來準備一下測試圖片,在picture的下面放一張史萊姆。
使用下列這個函式,寬高一定要跟原圖大小一樣喔!
this.drawImage( 檔案名稱 , x ,y ,寬 ,高 )
像這樣寫:
看吧,是不是出來了?
什麼會當機?
其實因為drawImage是我寫的,不是常規函式,所以把下列這段貼到空白地方,再試一次即可。
Window_Base.prototype.drawImage = function(ImageName, x, y, width, height) {
var bitmap = ImageManager.loadPicture(ImageName);var sx = 0;var sy = 0;var sw = width;var sh = height;var dx = x;var dy = y;
this.contents.blt(bitmap, sx, sy, sw, sh, dx, dy);
};
我是把這函式放在Window_Base裡面,所以建議這段貼在另建的Window_Base_Plus.js裡面,統一管理會比較好。
目錄: