接續上篇用Excel輸入道具後,我們就可以來自訂道具的分類。
YEP也有類似的插件可以得到相同的效果,也算是蠻好用的,
不過用了就不用往下看了|||
//-------------------------
// 正文開始
//-------------------------
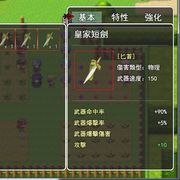
在MV的item裡面,有一個叫做itypeId的欄位,就是他們:
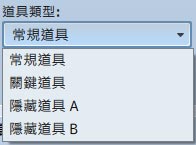
他們有對應的編號,上到下是1~4
如果用Excel輸入的話呢,就可以輸入以外的範圍,想用多少數字就用多少,不會當機的放心。
我們就可以設定
5 藥水
6 材料
7 炸彈
8 強化藥
這是舊圖,把圖中itypeId改成3,即可。
然後呢,遊戲裡面要如何顯示呢?
在rpg_windows.js裡面的Window_ItemList()裡面的includes()
Window_ItemList.prototype.includes = function(item) {
switch (this._category) {case 'item':
return DataManager.isItem(item) && item.itypeId === 1;
case 'weapon':
return DataManager.isWeapon(item);
case 'armor':
return DataManager.isArmor(item);
case 'keyItem':
return DataManager.isItem(item) && item.itypeId === 2;
default:return false;}
};
這段的功能就是他!

道具對應到 item.itypeId 1
任務對應到 item.itypeId 2
所以只要把1改成5,就可以把這個道具的功能變成只顯示藥水
那如果覺得這四個不夠用,想要增加數量呢?
就需要修改this._category
this._category是從哪裡來的呢?
是這裡:
Window_ItemCategory.prototype.makeCommandList = function() {
this.addCommand(TextManager.item, 'item');this.addCommand(TextManager.weapon, 'weapon');this.addCommand(TextManager.armor, 'armor');this.addCommand(TextManager.keyItem, 'keyItem');
};
這四行對應了那四個按鈕,也就是說只要像這樣加一行在裡面
this.addCommand('藥水', 'potion');
然後這個也加兩行:
Window_ItemList.prototype.includes = function(item) {
switch (this._category) {
case 'item':
return DataManager.isItem(item) && item.itypeId === 1;
case 'weapon':
return DataManager.isWeapon(item);
case 'armor':
return DataManager.isArmor(item);
case 'keyItem':
return DataManager.isItem(item) && item.itypeId === 2;
case 'potion':
return DataManager.isItem(item) && item.itypeId === 5;
};default:}
return false;
藥水就出來了

如果一個分類內同時顯示 藥水+炸彈 呢?
藥水是5,炸彈是7
所以就是最後要寫成:
return DataManager.isItem(item) && ( item.itypeId === 5 || item.itypeId === 7 );
比想像中的還簡單對吧!
補記:
其實Excel並不是必要的東西...
也可以自己開啟json檔案手動修改id...